Wednesday, October 30, 2013

More Great Entries!!


As of the time I began to write this post; there are now 46 wonderful entries to view and be inspired by, with only a day left to enter those last minute projects.
I can't believe how fast the time has gone, here in Missouri I think we skipped autumn and went straight to winter! it has gotten so cold so fast and the leaves are just now starting to change.

This month we had a lot of really great handmade fall decor, and I cant wait to try some of them!
Here are 3 of the latest entries that really caught my eye.

These Cute Pine cone owls are just the cutest! 
and was made by Lynda


  This simple Beauty was made by Donna


IMGP1714

And this Classy Elegant card was made by Heather!

The challenge will close in approximately 28 hours at midnight PST, and the winner will be announced November 2nd, so good luck and have a great weekend!

Hannah and The DCD Design Team

Monday, October 28, 2013

One of a Kind!

Creative Play is our sponsor, so hop on over and visit them.

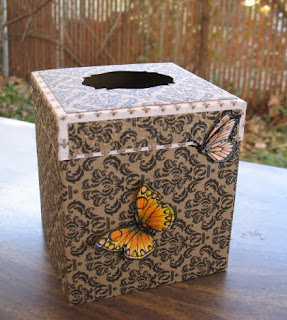
I was checking out Pinterest and came across a tissue box cover, not just an ordinary tissue box cover, but a GORGEOUS tissue box cover here.  I followed the link to this website, called Paper Cookies.  Delightful name, eh?.  She's done a tutorial that is so easy to follow and so easy to do, that you will want to make one too. You can also see the written tutorial at Split Coast Stampers here.  You really do need to visit Diane Zechman's blog.

An Autumn take on Diane's tissue box cover.  (Talking about Autumn, there's still time to enter the October Autumn or Animal challenge.  See our sidebar)

This is the top and I forgot to emboss it, oh well, only I will know... well, you too, and I know you won't tell.

Undecorated side, which looks pretty darn good.  The top strip is embossed with a similar design as the cardstock.

I decorated two of the sides and cut out the Hero Arts butterflies & bird from Antique Engravings (CL383), still one of my favorite stamp sets, ever. 

I am very pleased with my tissue box cover.  Two sides are left clean.

The color of the box in this photo is not the true color of the box.  The previous photos show the true colors.  I wanted to get a better photo of the box so you could see exactly how pretty it is.
I hope you enjoyed this and try one too. 

Friday, October 25, 2013

Inspiration Via Google


Why Google you ask, when you can find plenty in our very own flickr group? Well I have more online accounts then I can count and rather then signing up to view and save images I like to just be able to type it in, and I like to look beyond just another card, I like to find inspiration from, paintings or drawings, and photographs or just looking around at decorations in windows and shops.
So when I think of a theme or something similar I just put a short description in the google image search box and press enter, and within seconds lots of fun and interesting things pop up to inspire me. In-fact this is how my idea for this months challenge came about!

So if you are interested, copy the following into the search box or click on the links, and be inspired!

vintage fall pictures
autumn leaves
pumpkin designs
animals and autumn
autumn paintings by famous artists
old houses in autumn
fall decorating ideas

    Hannah and the DCD Design Team

Thursday, October 24, 2013

Autumn is Here!

I went to a Stenciling class on October 2nd and this is what I accomplished, with expert help form our teacher at The Stamp Art Shoppe.  I used the same stencil, but they look totally different, don't they?
This is a new Dreamweaver Stencil "Oak Leaves" and we got to play with it on different textures.  

All cards are dry embossed.   
The first card: The top rough panel was stippled with different ink colors, then Translucent Embossing Paste was applied with the stencil still in place.   The Oak Leaves stencil was removed and glitter was sprinkled onto the wet paste and the panel was left to dry.  The dried panel was attached to the dry embossed brick panel which  was quite glossy and had Memory Box pads applied directly to the panel, then wiped off.  Some ribbon and a greeting completed this card.  I'm very happy with it.

Mirror paper was stenciled and many colors of Distressed Stickles was applied with the Oak Leaves stencil in place.  The mirror panel was attached to a dry embossed silvery panel and that panel then adhered to a dark green note card.

This pre-embossed white panel was used to dry emboss the Oak Leaves on a light table.  With the stencil in place, the image was painted with a stipple brush dabbed in Fall colors.  I then put the card together and adhered the Heart Winged Butterfly I had stamped and embossed in white and stippled with distress inks..  

You can find inks, distress Stickles, and stamps at our sponsor, Creative Play.

Arlene and the Die Cut Divas


Wednesday, October 23, 2013

October Coming to a close?


No Problem! there is still plenty of time to enter your card/projectsby clicking the link above this post or go HERE till October 31st at midnight PST.
  Just remember all projects must be made after October 1st and have at least one die cut or embossing folder.   You can enter up to 4 times.
This Months Theme is Animals and Autumn, which means you can enter a project, using an animal and/or autumn stamp, die, or embellishment, the choice is yours!

Can't wait to see what you come up with!
      Hannah and the DCD Design Team


Monday, October 21, 2013

In the Spot light


Still not in the mood for autumn cards, or do you just need an idea?
 Here is some inspiration from this month's challenge participants that may help you,


Fall Burlap Candle Holders
One of my favorite things to do is to decorate the house with each season, especially fall! and these candles are a very simple yet elegant.


Created by Silke: visit her blog for more cute fall decor idea's.


This Card is clean and simple, but it just seems Majestic to me! the colors are subtle but it all just pops out at you.


Created by Deb
you can see more or her Beautiful cards on her blog here


Isn't this such a Cute Card! I'm always looking for idea's making shaped cards and this is perfect!


Created by Sue See her blog here


Of course this is just a few of many entries, you can view all of them Here, and even add your own card/project to the pool of wonderful cards for a chance to win this lovely die from Creative Play Stamps

Happy Crafting!
Hannah and the DCD Design Team


Friday, October 18, 2013

DT Favorites from Our Guest Designer Kathy Raccoosin

Good Morning!
It has been such a fun week with Kathy, and I'm sad to see it end, but before she goes our DT want to thank her for such a lovely time and such Beautiful cards!  

To finish this fun week off, each of our DT chose a favorite of her beautiful work to share with you today 

Hannah's Favorite
Picking a favorite can be quite difficult when it comes to choosing one of Kathy's creations, and I mean that in a good way, all her work is just beautiful! But this particular card really popped out at me.
This reminds me of when you go to the store looking at faux flowers and say to yourself " it looks so real!"(which can occur occasionally, but not often) I mean does this card look handmade to you! This is what hallmark is supposed to be able to do! the details and vibrant coloring put me in awe, of what you can do with paper, stamps, and markers.


Arlene's Favorite
You can really tell all the work she put into this card.  One of my favorites from The Daily Marker  is in June of this year.  Kathy uses her dies and patterns in unusual ways which have a "WOW" factor.  She can put together patterns and colors to create a masterpiece.  This presentation calls to me.  Kathy strives for perfection and meets the challenge every time!

Dawn's Favourite
This card of Kathy's was done in November 2012.  You can see the amazing tutorial on her blog post HERE. 
The roses are so realistic looking and I just love the way she distressed the background.  The centre seems to glow.  As usual Kathy has added all the delightful extra such as the banner and buttons, stitching and Spellbinders edging.

Paula's favourite
When Hannah asked us to choose our favourite card from Kathy's blog I knew that it would be a very hard pick for me.  I see so many gorgeous cards on Kathy's blog that I wanted to pick them all.  Truly Kathy is an amazing artist.  I just love the way she creates scenes with such amazing detail, like she has on this card.  Please stop by her blog & check out all of her other amazing  creations.


All of these are very unique in their own way, and very special, I would recommend becoming a follower of her Blog so you don't miss out

Kathy! Thank You So Much for joining us, is was such an honor to have you as our guest,  your work is so amazing and inspiring. We loved having you.

Hannah and the DCD Design Team

Wednesday, October 16, 2013

A Tutorial from Our Guest Designer Kathy


 Well Hello again Ladies,
 Come back to see more of Kathy's lovely work? Today she has a Copic coloring technique to share with you!


Photo 1. Scribble color with Y17

Photo 2. Add highlights with YR16

Photo 3. Add darker highlights with YR27

Photo 4. Blend dark highlights with YR16

Photo 5. Add more highlights in the cracks  areas with YG95.
Photo 6. Lighten the tips of the petals with Y00.
Photo 7. Distress the tips of the leaves & cut out. 
Photo 8. Stamp image again. Color pink, add bling to the center.


And the result...... This Lovely card!

Thanks Kathy, the card is Beautiful! Your shading technique was very helpful, now I just need to buy more copics!

If you missed Kathy's Intro Yesterday click here and visit her blog, she always has great idea's and coloring techniques to share.
And be sure to stop back by Friday to see our DT's Top Picks of Kathy's Projects, and to thank Kathy for a Great Week!

        Hannah and the Die Cut Diva's

Monday, October 14, 2013

Guest Designer of the Month......Kathy Racoosin


Lets get to know, Kathy Racoosin!!!!


Tell us a little about yourself:  
Since I was young I was searching for the perfect creative outlet. My friend was on a trip and she learned how to emboss. When she shared with me the magic of embossing I was hooked immediately! I finally found what I had been looking for all those years. Rubber stamping and coloring the images with markers.


How long have you been a card maker/scrapper & when did you start?
I believe I started in 2008 and blogging in 2009.


Do you follow sketches or dive right in?
I think I would benefit from sketches but, I dive right in


How many projects do you make a week?
About 2 or 3 but, varies


What is your favourite tool (what can't you create without) & why?
A black marker to trace over my images and a white gel pen


What at the moment is your most favorite thing to do on your project?
I’m really into stencils now i feel like they are the new background stamp. easy to store and you can do more with them.


How would you describe your style?
Colorful and often dottie :)


What about your style would you change (or not) & why?
I wish I could create more simple designs but, I get too carried away and don't know when to stop.


Have you been published or on a Design team - when & where?
I have designed for the teams of Simon Says Stamp, Penny Black, Basic Grey, Two Peas in a Bucket & SRM Stickers, to name a few and I have guest designed for the Online Card Classes, as well as Purple Onion Designs.


Describe your crafting area
I have a mix of antiques and white contemporary furniture with lots of light. I will try to send photos :)


Do you have a blog? If not where can we see more of your fabulous creations?
yes  I have two blogs
My FOOD blog: http://kathydishes.com/

Now that you have finished reading about Kathy...Have a look at her fantastic work below. and please visit her blog and leave her some comments here as well, she would love to have you.


Thank’s Kathy it was great getting to know you! Your cards are indeed very colorful and that is what I love about your style, all your cards and projects are so vibrant!


If you want to see more of Kathy come back Wednesday and Friday, I can’t wait to show you!

Hannah and the Die Cut Diva's

Saturday, October 12, 2013

Wise old owl

Hi Lovelies,

I have to say that I'm loving all the entries so far in Hannah's challenge.  You all rock!  I'm hoping to comment on all your creations before the end of the month.   That's if my laptop doesn't have any more death wishes & dies lol.

Today I thought I'd share a card that I made with you all.  I used an animal & stamped some leaves on the background (can't see them that well) in what I think are Autumn tones, Crushed Olive, Wild Honey & Rusty Hinge Distress inks.

I kept it fairly simple as I really wanted the owl to stand out. I can see this card being used for a heap of different uses.

I can't wait to see what else you create

Friday, October 11, 2013

Trick Or Treat, goody boxes


Hey there,

Here are some cute idea's for handing out treats for halloween in a fun way,
I have several boxes on my Silhouette to choose from, so here are examples of some different fun things you can make.  There are hundreds like these for digital, hand crank, or cartridge, die cutting systems, or  you can scan....enlarge...print...then cut...and fold...and glue, like I used to do before I knew about die cut machines. Boy did I miss out! now I can do it in a matter of minutes without half the hassle!  and it's more fun too ; )

The Classic Box
This is the simplest of the boxes just a few folds and little adhesive 
in the corners, before I assembled I colored with distress inks
and added the horse die.

The Pillow Box
This one is perfect for small gifts and prizes, and also requires
just a teeny bit of adhesive on the back, and the sides
just pop open with a little pull. 
It fits individual candy packets just right.
I also colored this with distress inks and added the ghost die on top.

The Pyramid Box
 This one makes a  great sucker cover, and all it needs
 is a tie, no adhesive necessary, 
I just used pattern paper and some ribbon.

The Candy Wrapper

You can fit lots of little goodies in here, 
and it's just like the peppermint wrappers.
I found this to be the hardest, but once you get
 the hang of it it's fairly easy to do.

These are just a few of many many fun ways to gift small things, or for little treats and prizes,

Hope you enjoyed and get a chance to make one, they are great all year round for Birthday's Parties, Holidays, and so on.

Hannah and the Die Cut Divas

Wednesday, October 9, 2013

I've Run Out!!!!!


I think we all have those moments where we are on a time schedule, and what happens? we run out of adhesive and there is no time to get another!  So what can you do when that occurs?

As I was preparing for this month's posts that very thing happened to me, and there wasn't time to run to the store and buy more adhesive, my projects had to be ready.  My only option was to use glue which I wasn't to happy about, but it had to be done, so I went to my craft drawer to find an alternative  when I remembered about my Tombo Mono Multi  Liquid Glue.

It's the perfect solution is a pinch, though it does take about 15 minutes or so to dry, depending on the amount you use.
You have the "pen tip" which is perfect for adhering small images or die cuts with thin fragile lines,
and the "broad tip" for larger area's, this acts like a glue stick.  
As you gently squeeze the middle, it comes out in a small glob and you use the broad area like a glue stick to spread it around. This is what I did for the Squirrel Card and my 2 cards from my "favorite die" post, I know those won't be coming apart!  Hopefully it doesn't happen to you often, but this is a must have, especially for those thin fragile dies.

See you back here Friday for some more fun! keep a look out for treats, or maybe a trick ; )
 Hannah and the Die Cut Divas


Monday, October 7, 2013

A Color Scheme


Sometimes it helps to have a "color scheme" to get you started on a project, but if you ask me when it comes to making Autumn cards your colors are right outside your door, you already know the colors you want.

But those of you who are not in the mood for fall cards yet, or it's not fall time for you this might help you get started.

Here at home the colors haven't quite changed, but the changes popping up little by little, on all of our neighborhood trees.  And as of today I'm packing my bags to leave on our favorite Autumn destination, across the river to Grafton IL, usually by this time the fall colors are in full bloom there, and the weather is perfect for hiking and biking and just relaxing at the Pere Marquette Lodge were we stay, chatting and playing games over a cup of cider or cocoa. 

Here are lovely cards made by Arlene and Paula:


Paula at Scraps of Me


Hannah and the Die Cut Divas

Saturday, October 5, 2013

Nuts about you

Hi Lovelies,

When is a cloud not a cloud?  When it's a tree of course :).


I really loved the idea of using things in different ways.  I guess it's a part of the whole repurpose, reuse, recycle & of course getting more bang for your buck.  I love how this card turned out - so much better than I thought it would.  I specifically made this as a guy's card.  After die-cutting three sets of  clouds I free hand cut out a trunk.  I layered some "leaves" behind the trunk & added pop dots to the front ones, similar to the Pinterest pin.  I then added the two leftover "leaves" to the base of the tree adding pop dots to one.  I coloured the squirrel with Copics & inked the edges of the leaves & sentiment with Walnut Stain Distress Ink.  I also embossed the background panel.

Well I hope that I have inspired you to play along with us this month.  I can't wait to see what else Hannah has in store for us all.

Happy crafting xoxoxo

Friday, October 4, 2013

Favorite Die of the Month


It has been my habit, to share with you each month a favorite die cut, in 3 posts throughout the week, but this month I am putting it all on one post.  So without further ado, this month my favorite die is.....


This lovely flower die and stamp set, from Hero Arts
below is the full set, but I will only be using the flower.


With this die you can create something elegant.....

or clean and simple,

and you can use the die by itself to create a cute little gift tag!
The choices are endless! as with most dies. 

When you stamp flowers you usually want to use more then one color, so here are some tips on inking your flower.  
If you have small ink pads such as the 1 inch cubes, those work perfectly to get the look you want, its very easy to apply  without getting messy or having to wipe off ink that got in the wrong place.
Bigger ink pads are a little trickier, for example to ink the little stem in between the petals of the flower, you'll want to turn the pad at an angle using just a corner, if you still get ink on the edges just take a wet paper towel and with your fingernail wipe it clean before applying the next color. I myself am still trying to master the trick, as you can see above, but with the right touch it comes out perfect.

Thanks for stopping by! I hope you get a chance to have fun with your favorite die this week
          Hannah and the Die Cut Diva's

Wednesday, October 2, 2013

Fourth WEEK WINNER OF DREAMWEAVER STENCILS

OUR SPONSOR FOR SEPTEMBER 2013


The winner picked out of a hat for the CELEBRATE challenge up through September 30th is:

Linda Palmer 

Congratulations to Linda Palmer.  You win the 4th and final week of our CELEBRATE challenge.  Thank you for entering our challenge.   This is your prize package!

It is so much fun to use an entire stencil or only a portion.  Easy to mask off what you don't want to use with removable tape.  Be sure to visit Stencils with Style and view the information about how to handle the stencils from opening them to using them.

You can either use our group email here on the site or my Flickr email where you can find me under Clarian's Hawk * Arlene.  I know you will LOVE your stencils. 

Arlene and the Die Cut Divas

Tuesday, October 1, 2013

Animals and Autumn October Challenge

Good Day Ladies
Welcome to an all new challenge, I hope you enjoyed playing with Arlene last month!

This is my Absolute favorite time of the year, I LOVE Fall, the weather, the leaves, and Thanksgiving dinner,
and have you ever seen the adorable pictures of puppies and pumpkins or in a pile of leaves!
 For example, this cute little guy!


So my Challenge to you is Animals and Autumn! I understand it isn't fall for everyone though, so here are your options:
Make a fall card..... Or one with an animal on it (of any kind) either using a photo or stamp, Or...  make a card combining the two options.  Just remember you must use at least one die cut or embossing folder on your project and if your new to our challenge rules, check out the contest rules tab above and have fun!


Sponsoring us this month is Creative Play Stamps! 
If you have never heard of them you should check them out, its a great online retail store with great prices!
I have found them to be very friendly and helpful,  and they also have monthly newsletters and coupons, so head on over and sign up at www.creativeplaystamps.com and don't miss out, oh and I forgot to mention they ship very fast too!

The Lucky winner will receive this cute Sizzix Bigz Die Flowers Leaves and Stems.


And now lets see what our DTs have for you.....

 This Cute fellow was from a picture I took 
when my family went to Colorado a few years back
(inside of card)
Hannah @ Hannah Nicole Art Studio


Arlene's example - A Bit of This and That


Paula - Scraps of me